Tuesday 19 January 2016

Get Machine: OpenStack Liberty VM


I have set up the new blog where I will publish download links to virtual machines which I prepare for my blogs readers.

At the start there is VirtualBox machine with the latest RDO:


Have a nice testing! :-)

Do not hesitate to ask me if you would like to get a version of the machines for another hypervisor. Besides VirtualBox, there may be VMware, KVM, Xen or Hyper-V.

Of course, any substantive comments, questions, requests or erratas are very welcome there as well. 

Also, if you need a paid consultancy or simply Linux or other (of my expertise) engineer, do not hesitate to contact me. :-)


Thursday 2 April 2015

Mini-HOWTO:
OpenStack & Thin Provisioning on RHEL/CentOS 7


This time it's just the mini how-to with some proposal for a fix.

If you are OpenStack user, you may meet the issue that when you create a thin provisioned volume from an image, it takes too long time than expected and the volume becomes too far from being "thin", even if the volume is marked as thin provisioned. Of course you could manually try to reclaim the unused space but it would take extra steps and some time.


So, if you want to save your time (and the utilization of the storage) and you can have a look at the list of OpenStack (Linux) processes, then the qemu-img seems "a very good" suspect of the issue. You may be right, because it's very probably that your block storage needs a special command for the proper thin provisioning and doesn't receive these commands from the qemu-img utility.

OpenStack (its Cinder component) uses qemu-img to transfer a data between images and volumes (e.g. iSCSI). For SCSI protocols the missing commands may be UNMAP or WRITE SAME (with UNMAP bit).

The commands have been supported by QEMU since version 1.5, but the qemu-img (the convert feature) supports them "by default" only since version 2.0. Also the later versions of QEMU bring some more improvements in there.

But RHEL/CentOS 7 (and 7.1 too) has the qemu-img at version 1.5.3 what obviously can cause the issue. Red Hat within the latest products - e.g. OpenStack Platform 6.0.1 (the latest one) - provides qemu-img 2.1.2 (the new package name is qemu-img-rhev). For those ppl which need the proper thin provisioning just for testing purposes and don't have the access to RHEL OSP 6.0.1, I have prepared the qemu-img 2.1.3 package. The rpm is based on the sources from Fedora 21 updates.

I would recommend to install the package in the OpenStack node without QEMU installed as hypervisor. For example, the installation may look like below:


Finally you should be able to create new volumes from images where the new volumes are actually thin provisioned since they are created. So, have a nice provisioning! ;-)

As usually, any substantive comments, questions, requests or errata (related to my post) are very welcome. 

A few references/links:
 

Friday 20 March 2015

Storage for the cloud:
OpenStack & HP StoreVirtual 
(as example)


One of the most important components of every cloud is its storage. In this post I would like to show you how to set up the block storage in OpenStack platform. As example of the storage backend I will take one of the SDS (Software Defined Storage) solutions - HP StoreVirtual.

SDS market is emerging, growing and different vendors use this name in more or less different ways (e.g. more or less "hardware-agnostic" way), but SDS is not the topic of this post. Although I will probably come back to it in some of the next ones. Just to mention now, other SDS vendors include IBM (Spectrum Storage), NetApp (Data ONTAP Edge), Nexenta (NexentaStor), StarWind (Virtual SAN) and a few more. Also EMC (besides VMware's Virtual SAN) is more "software defined" (through ViPR and ScaleIO). If we look at the world of open source software, the Ceph is a very good project (now supported by RedHat) and the software is often used as OpenStack storage. However, it doesn't have a direct support for non-Ceph (non-RBD) protocols like iSCSI or FC(oE) (yet).

But let's go back to our example. The OpenStack block storage component (named Cinder) has built-in support for most of industry-leading storage platforms. Even if there is no built-in volume driver for our storage, OpenStack is currently the widely recognized platform and very probably our vendor provides it.

Regarding the EMC storage (ViPR, ScaleIO, but also VMAX, VNX and others), the company is one of members of the OpenStack Foundation. Some of the drivers are part of the OpenStack source distribution, others are provided by EMC separately. If you are EMC customer, this post may be useful for you.

The OpenStack platform supports FC switches (zoning) as well. Brocade and Cisco drivers are included in the main distribution (and so RedHat, etc.).

However in our case (of HP Lefthand/StoreVirtual storage), the only supported protocol is iSCSI. For the volume management the OpenStack driver supports CLIQ (SSH) and REST interfaces of HP LeftHand OS.

Before we can run the driver in the REST mode (it requires LeftHand OS version 11.5 or higher), firstly we may need to have the PIP (Python packages installer) installed. For the Enterprise Linux distributions (RHEL, CentOS) the installer is available from the EPEL repositories. The rpm package name is python-pip:

yum install -y python-pip

The next step is the installation of the HP LeftHand/StoreVirtual REST Client (at the moment the client's most current version is 1.0.4). For example:


The OpenStack Block Storage component takes own configuration from the /etc/cinder/cinder.conf file. To work properly the driver needs parameters like below:

# LeftHand WS API Server URL
hplefthand_api_url=https://192.168.100.5:8081/lhos

# LeftHand Super user username
hplefthand_username=tomekw

# LeftHand Super user password
hplefthand_password=oiafr944icnl93

# LeftHand cluster to use for volume creation
hplefthand_clustername=Klaster1

# LeftHand iSCSI driver
volume_driver=cinder.volume.drivers.san.hp.hp_lefthand_iscsi.HPLeftHandISCSIDriver

## OPTIONAL SETTINGS

# Should CHAPS authentication be used (default=false)
hplefthand_iscsi_chap_enabled=false

# Enable HTTP debugging to LeftHand (default=false)
hplefthand_debug=false


If we are going to use more volume backends within the same Cinder instance, we should enable the multiple backends support and separate the backends configurations. In the cinder.conf there are special parameters and sections for this. For example:

enabled_backends=lvmdriver-1,hpdriver-1

[lvmdriver-1]
volume_backend_name=LVM_iSCSI
volume_driver=cinder.volume.drivers.lvm.LVMISCSIDriver
# Name for the VG that will contain exported volumes (string value)
volume_group=cinder-volumes
# If >0, create LVs with multiple mirrors. Note that this
# requires lvm_mirrors + 2 PVs with available space (integer value)
#lvm_mirrors=0
# Type of LVM volumes to deploy; (default or thin) (string
# value)
#lvm_type=default

[hpdriver-1]
volume_backend_name=HPSTORAGE_iSCSI
# LeftHand iSCSI driver
volume_driver=cinder.volume.drivers.san.hp.hp_lefthand_iscsi.HPLeftHandISCSIDriver
# LeftHand WS API Server URL
hplefthand_api_url=https://192.168.100.5:8081/lhos
# LeftHand Super user username
hplefthand_username=tomekw
# LeftHand Super user password
hplefthand_password=oiafr944icnl93
# LeftHand cluster to use for volume creation
hplefthand_clustername=Klaster1
## OPTIONAL SETTINGS
# Should CHAPS authentication be used (default=false)
hplefthand_iscsi_chap_enabled=false
# Enable HTTP debugging to LeftHand (default=false)
hplefthand_debug=false

In a case of multiple backends the Cinder scheduler decides which backend the volume has to be created in or - if there are different volume_backend_name(s) - we may choose a backend. If we have used the same volume_backend_name with two or more backends, the capacity filter scheduler is used to choose most suitable backend.

The Cinder documentation:

The filter scheduler:

1. Filters the available back ends. By default, AvailabilityZoneFilter, CapacityFilter and CapabilitiesFilter are enabled.

2. Weights the previously filtered back ends. By default, the CapacityWeigher option is enabled. When this option is enabled, the filter scheduler assigns the highest weight to back ends with the most available capacity.

The scheduler uses filters and weights to pick the best back end to handle the request. The scheduler uses volume types to explicitly create volumes on specific back ends.

In short, we can use the filters (which are parametrized per backend) also as a part of our storage management policies.

After all the configuration of the volume drivers, we have to restart the cinder-volume service and we may link the new backends to volume types:


Now we can create a new virtual machine which requires more disk space than it was available before:


So, the new disk volume is created...


and it is taking place in our new backend (the new array).
Of course, we can see the new volume in HP StoreVirtual Centralized Management Console:


In our case iSCSI is the protocol in use:


For this post, that's all. I hope you have found it useful. As usually, any substantive comments, questions, requests or errata are very welcome. 

Some references/links:
 

Wednesday 17 December 2014

Cloud automation and orchestration: OpenStack & Control-M


When you want to automate or orchestrate your cloud(s) you have at least a few choices. The command line tools and scripting is the very basic one and rather a very "old-fashioned" way. Probably the best choice would be a mix of automation or orchestration tool and the cloud management software like BMC Cloud Lifecycle Management, VMware vRealize or yet another one (e.g. Microsoft System Center, Red Hat CloudForms, etc.). Anyway, most vendors of cloud computing software (or services) provide a web service interface for the solution and it usually covers all or almost all the levels of the cloud management. The most of the web services are RESTful or REST-based.

In this post I would like to present how to start using the web services. Just for the example I will not use any high-level cloud management software (which you may not have or even are not going to have). I am going to use the cloud platform directly, but this particular platform has also capabilities of orchestration, so some higher level is already built-in there.

As the title says, let's have a special look at OpenStack and Control-M (as the automation tool).

Control-M already has got a module for clouds. It is called Control-M for Cloud and does not require much knowledge about the web services. Unfortunately the current version (v7) directly supports only VMware vSphere, VMware vCenter (both use WSDL/SOAP) and Amazon EC2 (by the way - EC2 SOAP is deprecated now and will not be supported after 2014). However...

...Control-M has got also Control-M for Web Services module (plug-in). Since the version 8 of the module, it supports not only WSDL/SOAP (like before this version) but also REST-based protocols, so the module may be used with many other cloud computing products and services (VMware vRealize/vCloud, "non-SOAP" AWS, Microsoft, OpenStack, Xen, etc.).

OpenStack consists of some components, about of 10 in the current version. Most of the components have the REST(ful) service interface. So, we can use all of them within our automation tasks. OpenStack includes also a special component for orchestration - Heat. If you are familiar with Amazon Web Services CloudFormation Query you may use your knowledge (and the previous work) with Heat, because the OpenStack component provides the CloudFormation-compatible interface as well (in addition to the native one).

Heat works with templates which have been named HOT :-) (Heat Orchestration Templates). The AWS CloudFormation templates can be used too. If we use the Heat REST service, our template may be provided through any external source (URL) or within the HTTP(S) web service request.

The Heat service can be used like other web services of OpenStack. So, our tasks and processes can evolve from the automation form to the orchestration without much effort in this particular area.

For our example let's use very basic and simple template as below:

heat_template_version: 2013-05-23
description: Simple sample template
resources:
   my_instance:
      type: OS::Nova::Server
      properties:
         name: TestInstance
         key_name: rooty
         image: RHEL 7 Base
         flavor: RHEL.Base
         networks:
           - network: int-net

The templates are formatted usually in YAML (the data serialization format) but JSON (JavaScript Object Notation) format is also supported. With Control-M we will use the JSON. The full HTTP/REST request body will look like below:

{
  "stack_name": "TestStack",
  "template": {
   "heat_template_version": "2013-05-23",
    "description": "Simple sample template",
    "resources": {
       "my_instance": {
          "type": "OS::Nova::Server",
          "properties": {
            "name": "TestInstance",
            "key_name": "rooty",
            "image": "RHEL 7 Base",
            "flavor": "RHEL.Base",
            "networks": [ { "network": "int-net" } ]
          }
       }
    }
  }
}

This particular template makes a simple stack which contains just one resource - the virtual machine instance with Red Hat Enterprise Linux in.

HOT templates have many features and can be very useful. If you are beginner here, I would recommend reading the Heat Template Guide. Full description of the template format can be found in the HOT specification.

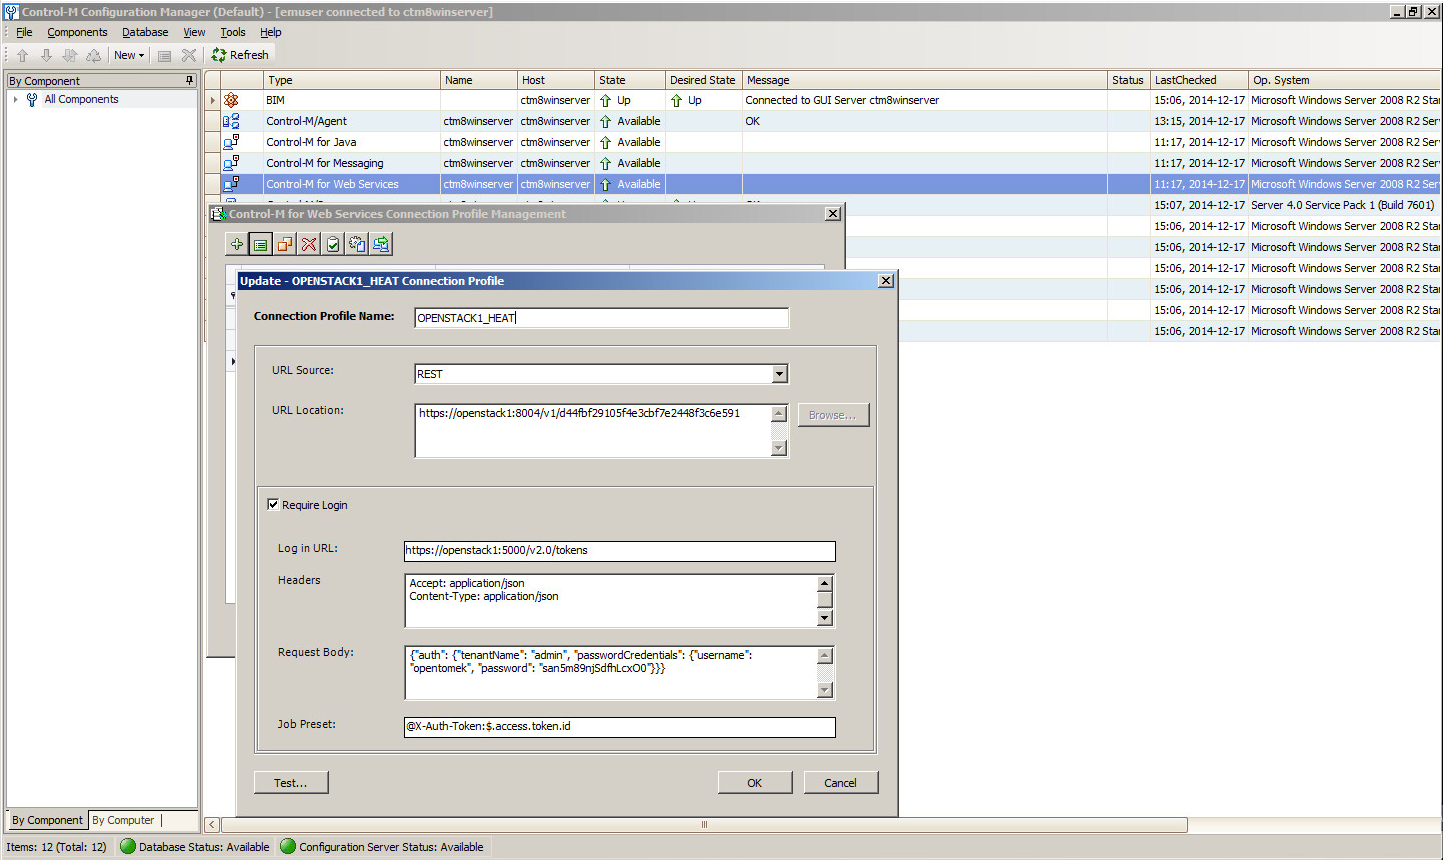
Before we can use the Heat service or any other of the OpenStack, we have to log in to the cloud platform and receive the authentication token. The OpenStack component for identity (named Keystone) is responsible for this. It may be integrated with external identity providers/services, but in our case we will use the user/password authentication.

It's nice that Control-M for Web Services supports the REST authentication process by "out-of-the-box". Like usually, we may define all the details in the Control-M Configuration Manager.

In our case I use the Heat (Orchestration) service to orchestrate (to deploy and remove the stack) and the Nova (Compute) service to automate only (to stop and start the virtual machine), so the two web service connection profiles have to be defined:


They may use the same or different OpenStack user accounts. When we have the profiles, we can start working on the Control-M jobs and then we should not forget about the special HTTP status codes of the OpenStack REST actions. If we have forgotten to handle the codes, our job can fail when the result code is fine for our action.

So, there is the sample job for the orchestration (the deployment of the simple stack):


The next job removes the stack (so the machine) if it is necessary:


But when we have the machine running yet, sometimes we may need to stop it only for a while or to do something else with this machine. OpenStack uses special IDs to differentiate between the instances, so if we know the machine name only, we have to get the ID before we can do the action.

The job to get the ID:


The next one which can stop the machine:


After some time we may need to run the machine again:


That's all for now. Just in case I have made you ;-) interested in the OpenStack REST services, they are described in the OpenStack API Complete Reference.

Anyhow, I hope you have found this post useful. As usually, any substantive comments, questions, requests or errata are very welcome. 

Something to read and/or try:
 

Thursday 27 November 2014

Deploying and patching Control-M/Agent through Puppet


BMC Control-M/Agent(s) can be deployed like most of an agent software is. If you are a long-time customer of BMC, probably you already have and use BMC BladeLogic Server Automation. But if Control-M is the only tool from BMC and your infrastructure has a lot of Linux (virtual or non-virtual) machines with Puppet (and Puppet agents which are already installed), you may use the Puppet for the deployment of the Control-M/Agent. Unfortunately it's not easy to find any ready-made module for this task, even more - Puppet sometimes is considered as alternative to Control-M. Of course, I don't think it's a real alternative, not yet at least.

Back to the modules, I had not found anything specific in the Puppet Forge, so I made something own. :-)

The modules (two classes in separate modules which I am sharing with you) are very simple but have the useful parameters. For example they can be used like below:

Class['controlmagent'] -> Class['controlmagent_fixpack']

class {'controlmagent':
   userLogin => "ctmuser",
   installDir => "/controlm/ctmagent",
   primaryServer => "ctm8server",
   authorizedServers => "ctm8server",
}

class {'controlmagent_fixpack':
   userLogin => "ctmuser",
}

The installation of Control-M/Agent (with the controlmagent module) itself is made of a few steps:
  • Checking if the agent is not installed yet (the installed-versions.txt file checking)
  • Making the temporary directory if not exists
  • Downloading the Control-M/Agent installation tar from the Puppet server (its general repository of files)
  • Preparing the XML file for the silent installation
  • Extracting the Control-M/Agent installer from the tar
  • Running the installer
The second of the Puppet modules (the controlmagent_fixpack module) does the job not much different from the typical installation of the Control-M/Agent Fix Pack:
  • Checking if the agent is installed (the installed-versions.txt file checking)
  • Checking if the Fix Pack is not installed yet (the installed-versions.txt file checking)
  • Making the temporary directory if not exists
  • Downloading the Control-M/Agent Fix Pack installation file from the Puppet server (its general repository of files)
  • Shutting down the agent
  • Running the installer
  • Bringing the agent back
Of course, the modules and classes could be more advanced but they should be good enough for typical scenarios.

While testing, you should get the output like this below:


The view on the same proces but in the Puppet Dashboard:


Ok... I hope you have found this post or/and the modules useful. As usually, any substantive comments, questions, requests (for example - a special, more advanced version of the modules) or errata are very welcome. 

Most important references:
 

Thursday 13 November 2014

Monitoring Control-M
with Nagios


BMC Control-M can be integrated with monitoring tools by many ways. For example, we can use the PATROL Knowledge Module (which additionally has a nice capability of Control-M/Server failover automatic switching, similar to that which is typical for active/passive clusters) or the Control-M/EM integration with SNMP and external scripts (XAlertsSendSnmp parameter). With other built-in mechanisms (e.g. SendSnmp, Remedy integration, BIM-SIM, etc.) not only monitoring Control-M processes can be done but monitoring the jobs as well.

However, what if our monitoring system is Nagios or one of its derivatives, like op5 Monitor? Do we have to rely on the Control-M/EM and SNMP?

Not necessarily. We can make a use of the wide selection of Nagios plugins. If we haven't found any interesting plugin (which could be used to monitor Control-M), we can make the new one :-) The Nagios plugin interface is not very complex and even a shell script can be the plugin.

I have made the sample plugin for Control-M/Server 8 on Linux/UNIX. The plugin has two input parameters: the Control-M/Server user's home directory and the Control-M/Server home directory. The example call is below:

/usr/lib64/nagios/plugins/check_ctmserver \
/home/ctmuser /home/ctmuser/ctm_server

The plugin calls Control-M/Server's shctm script and the .ctmprofile file (from the Control-M/Server user's home directory), so the requirement is that the Nagios user (e.g. nrpe user) has permissions to read and execute the scripts. I would recommend to assign the user to the Control-M/Server user's group.

When called, the plugin parses the shctm output and returns the information to Nagios.


Of course, it also gives the exit code, which is: 0=OK or 2=CRITICAL (if some of the Control-M/Server processes are not working).


That's all. I hope you have found this post or/and the plugin useful. Any substantive comments, questions, requests (for example - a special, advanced version of the plugin - with performance data, etc.?) or errata are - as usually - very welcome. 

A few references:
 

Wednesday 5 November 2014

The load-balancing with HAProxy and Control-M agents


HAProxy is well known as a tool for HTTP(S) protocols, but not every knows it can also work as the load balancer for other TCP traffic. Can we use it with applications like BMC Control-M? Let me try to answer the question.

BMC Control-M has features like Host Groups and Host Restrictions (based on current CPU utilization and/or number of jobs) which are recommended ways for load-balancing jobs. However, since the Fix Packs 1 (for Enterprise Manager, Server and Agent), Control-M 8 supports network load-balancing routers which also can be useful.

So, now it is up to your IT infrastructure and your IT scenarios which load-balancing mechanisms you can use or you prefer to use. I can also imagine that both of the ways, or even three ways if you think of Control-M's quantitative and control resources, may be used at the same time.

But let's go back to HAProxy.

In the simplest scenario we may have one load balancer (e.g. rh65haproxy) and two hosts (let's call them rh65haproxyA and rh65haproxyB) which are behind the LB router.

The configuration may look like below (in the file /etc/haproxy/haproxy.conf):
listen controlm *:7006
mode tcp
option tcplog
balance leastconn

server rh65haproxyA 192.168.10.54:7006 check
server rh65haproxyB 192.168.10.55:7006 check
Of course, this is a very basic sample only. HAProxy can be much more powerful utility and has a lot more features which can be set up. I would consider e.g. more of the server options (for example - the weight option) and also the use-server commands (in a case of more complex infrastructure or fail-over scenarios).

If you are the Red Hat systems user, the good news are that HAProxy is already a part of Red Hat Enterprise Linux.

Back to our scenario, after we set up the load balancer, the network load-balancing support feature must be enabled in the Control-M Configuration Manager. We have to go Control-M/EM System Parameters and look for the EnableLoadBalancerRouter parameter:


After recycling the Control-M Configuration Server we can define components of the new class - Network Load Balancer Router:


In the Control-M GUI (Monitoring) user interface, the network load-balancing looks like Host Groups, but "under the skin" it's a bit different from that:


That's all. Have the nice load-balancing! :-)

And, any substantive comments, questions or errata are - as usually - very welcome. 

A few references: